
Unit 31 Photography For Media Products
Analysis of photos P1

Photo 1
Martin Parr
This photo was taken by Marin Parr which was a photo of a cup of tea. When people look at this photo their first thought would be British people. The reason for this is because a cup of tea stereotypes British people because the stereotype of British people is that they eat fish and chips and drink tea.
Photographic Category
This photo would fit into the 'Social Documentary' category. A social documentary is where media based productions is involved with the public in some way. This photo is a social documentary because a cup of tea resembles people going somewhere and drinking a cup of tea.
Lighting
Purpose
The purpose of this photo is to show the kind of stereotype people think of British. The medium of this photo is art. This photo was based to be an art that can be used. This can also be used for advertising a cafe to promote a cafe that this photo may of been taken in.
Focus
For this photo that Martin Parr took he mainly wanted the focus to be on the actual cup of tea with a shallow depth of field so the main image is clear and focused.
Photo 2
Image Analysis
The image analysis comes down to what lighting the photo has, where the focus is on the photo, the framing of the photo and the fitness for purpose.
The type of lighting this photo that Martin Parr took has artificial lighting. The reason why this is artificial is because it uses the camera lighting and not natural lighting which is light such as sunlight and light from outside.
For Martin Parr's photo he took he used the framing to put the main cup of tea in the middle of the photo shot. This photo has the cup of tea in the middle of the shot and not to the left or right of the photo so the framing is the actual cup of tea in the middle of the photo shot.
Framing
Fitness For Purpose/meaning
The fitness for purpose of this photo that Martin Parr took, the fitness for purpose is mainly just to be used as art. There can be other uses for this photo such as to advertise a cafe this photo may of been taken in but the main fitness for purpose is to use it as art. The story behind this photo is a stereotype of British people because the stereotype of British people is that they drink tea and eat fish and chips.
Richard Drew
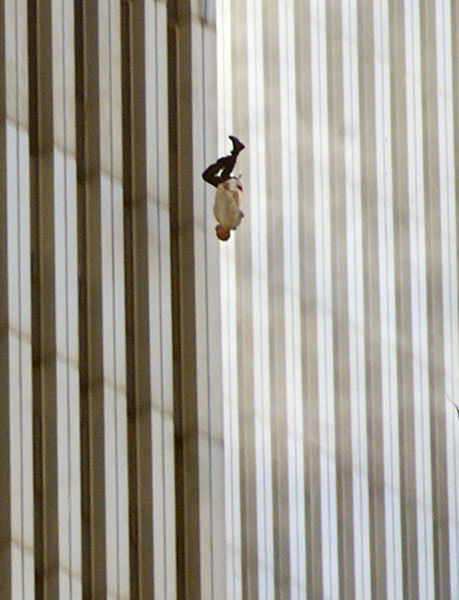
This photo was taken by Richard Drew. This is a photo of a falling man who jumped out of the twin towers when the disaster happened.
Photographic Category
The type of category that Richard Drew's photo fits into is a 'Social Documentary' category. The reason for this is because a social documentary is to do with media productions of peoples lives and in this photo when it was taken it was a man falling to his death when he jumped out of the twin towers so it fits into the social documentary category.
Purpose
The purpose of this photo that Richard Drew took is to remind people of what the tragic event 911 was like and so that the medium of this photo can be used in things like magazine articles and news papers.
Image Analysis
For the image analysis it comes down to 4 different things. This is the lighting, so where it uses natural or artificial lighting, the focus the image has, the framing of the photo and the fitness for purpose of the photo.
Lighting
The lighting in Richard Drew's photo is natural lighting. The reason for this is because in the photo that he took is uses the lighting of the sky and the sun and there isn't any ceiling lights or street lights in this photo so it is all natural lighting and not artificial.
Focus
The focus that Richard Drew used in his photo is the focus on the actual man falling to his death as he jumped out the twin tower in the time of disaster. There is more focus on the man falling than the actual tower in the background so the main focus is on the man falling to his death in this photo.
Framing
In Richard Drew's photo he used the framing to be in the middle. In this photo the man falling is in the middle of the shot but he isn't in the middle height wise but length wise he is in the middle of the shot so the framing of the shot is in the middle.
Photo 3
Fitness For Purpose/purpose
In Richard Drew's photo the fitness for purpose can be used for things like magazine articles and news papers because at the time of this tragic event this would of been a good photo to use in news papers and magazine articles. The story behind this photo is that this man who jumped out of the twin tower was petrified and wanted an easy death instead of still being petrified and possibly injured.
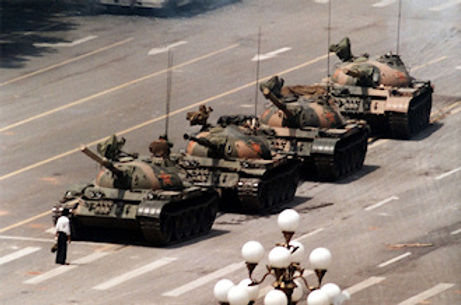
This photo was taken by Jeff Widener where a man was standing in from of a tank where there was some sort of military problems going on in China, This man was a unknown protestor.
Photographic Category
The type of photographic category that Jeff Widener's photo will fit into would be a 'Social Documentary' category. The reason for this is because this photo involves peoples lives and a social documentary is where a media production involves peoples lives in so the type of category this will fit into is a social documentary.
Purpose
The purpose of Jeff Widener's photo is to show what this man believed in and what he stood up for. The medium of this photo is so that it could be used in the news paper at the time of when this happened and it could of been in the news and in magazines.
Image Analysis
The image analysis consists of 4 different categories of the analysis which is the lighting of the photo so either natural lighting which is light of the sky sun etc and artificial lighting which is lighting from electrical lights like ceiling lights and lamp lights etc, the focus of the photo where it is focused on the photo, the framing of the photo where it is set on the position of the photo and the fitness for purpose of this photo.
Lighting
Focus
The lighting in Jeff Widener's photo that he took he used natural lighting. the reason for this because in this photo there is sunlight which is the lighting that he used in this photo and there isn't any electrical lights in this photo so it isn't artificial lighting but it is natural lighting.
The focus in this photo that Jeff Widener took is mainly on the tank and the man stood in front of the tank which is the protestor. The focus in this photo is more focused on the tanks and the ma than the background with the ground and the paint signs on the road.
Framing
The framing of this photo that Jeff Widener took is more to the left of the photo when he set and took the photo but there is more of a side view as well so it doesn't completely look like it is to the left of the photo.
Fitness For Purpose/meaning
The fitness for purpose in Jeff Widener's photo is that it can be used in things like magazines, news articles online and in the news in the time that this photo was taken when Jeff Widener took it. The story behind this photo is that it looks like the man is standing up for what he thinks is right.
P2 Planning My Photo Shoot
Introduction
for this part of the unit is where I plan my photo shoot. This photo shoot will be based on family members in my family so like my mum dad sisters etc and certain props that they use in their day to day life. For example my dads music studio set up would be a good bunch of props to use because he uses it on a day to day life basis.
The type of medium I would be shooting for is things like advertisement in news papers, articles etc and other things like self promotion so for example for my dads music he could use these photos to self promote himself. The most likely thing it will be published on is social medias like Facebook, Twitter, Instagram etc.
Kit List/relevant equipment
The type of kit that I will be using for this part of the unit is a pro DSLR camera, a tripod and artificial lighting if I need it. The reasons why I need this kit is so that I can use the camera to produce quality photos, a tripod to keep the camera still so I can get better photo shots and lighting if the specific area I shoot in is too dark I will use artificial lighting.
The types of props that I will be using is my families belongings in the photos to show people that look at the photo what my family members do on a day to day basis and what they use on a day to day basis.
Theme
For the photo shoot the type of theme that I will be going for is a 'Social Documentary' theme where in the photos it will be to do with peoples lives and have people and their belongings in the photos.
Legal/Ethical Issues
Location
For this unit there is many legal/ethical issues that may come across to me when I start the photo shoot. The first thing that would be a legal issue is to get my subject to sign a model release form to give me permission to take photos of my subjects and to use the photos. Another issue that would be a Ethical issue would be that if I were to print some photos it can affect the environment if I print too many because more and more paper will be used and more trees would be used. Another issue that is ethical may be that when it comes to my photo shoot some pictures may offend any religion/races so I need to make sure that none of the photos I take will offend any religions/races. Another issue that is legal is a copyright issue. I need to make sure any of my work isn't copyrighted and I must make sure that my wire isn't copying any other peoples work out there. One more ethical issue that may come across to me is defamation where people think the media lie and change things to believe it is true. So for example in magazines people are often photoshopped to make them look better and believable so I must make sure that none of my work is changed and is what the photo character originally looked like.
Shoot Schedule

Risk Assessment

P3 Producing 'competent' images
Image Mum
This is a photoshoot of my mum and what she does in a day to day life basis. This photo an be used in media products such as simple things like family photos or a magazine page on what mu mum does on a daily basis. The settings used in this photo was that the white balance was on tungsten light with the ISO roughly on 800 and was focused manually on mum and our family dog.


Image Youngest Sister

This is a photoshoot of my youngest sister on what she does in a day to day life basis as well. This also has a photo of her looking at the camera. These photos can be used in media products like family photos or a magazine specifically telling people and showing people what she does in her daily life. This photo had the white balance on tungsten and the ISO was roughly on 800. I also had to use the flash on some photos because it was too dark in some shots.


Image Younger Sister
This is a photoshoot of my younger sister on what she does on a day to day life basis. The type of media product these photos can go into is yet again family photos or a personal page in a magazine telling and showing people what my younger sister does on a day to day life basis. The settings on the photos is that in all these photos the white balance was on tungsten light and the ISO just over and under 800 in the different photos below. In some photos I had to use the flash setting because it was too dark and it was clearer in some the flash photos.


Image Family Dog
These photos are from a photoshoot I done on my dog and what he does on a daily life basis. The type of media product that these photos can go into is things like pet websites, pet magazines, flyers/posters or even news papers for pet owners or just a family photo. The type of lighting that was in these photos was the white balance setting tungsten light and the ISO roughly on 800 or above.


Image Dad
These are photos of when I done my photoshoot of my dad on what he does in his daily life. The type of media product these photos can be used for is things like music magazines and music studio setups on the internet or self promotion for my dads music with flyers/posters or on social media or personal magazine page on my dad on what goes on in his life etc. These photos both had the tungsten light white balance setting and the daylight setting because at one point I was outside to take some photos of my dad and the iso was roughly on 800 or above.


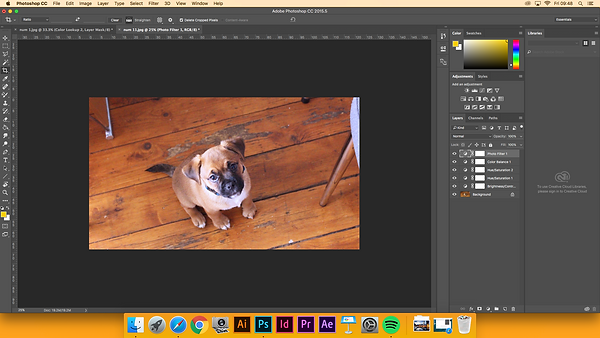
Dad Edit
P4&P5 Editing Photos&final 5 photos.
Original Photo
This is the original photo that I started off with before I edited it.
Edited Photo
This is what the photo looks like after it has been edited.
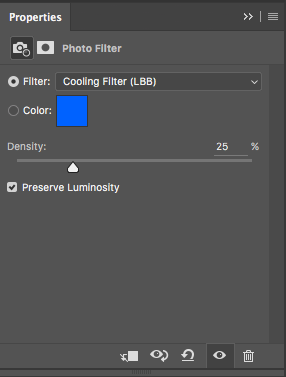
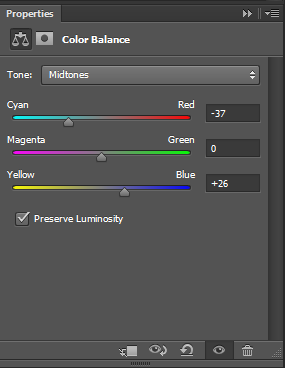
This is the final photo which is edited of my dad. The things that I changed on this photo is that I changed the colour balance, the brightness/contrast and the photo filter. In the end there is a little sepia touch to the look of it with a little bit of a cool down feature.
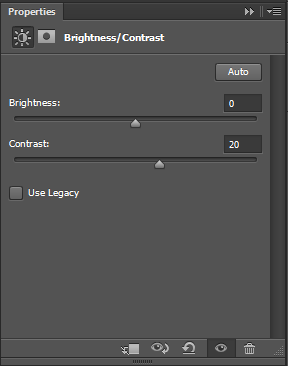
This is the brightness/contrast that I changed on the photo that I edited of my dad. I changed the brightness to 53 and the contrast to -7 on this photo

This is the colour balance settings that I used to change the way the colours look on the photo. I added more red to get a sepia look and added a little bit of blue to make it look more cooled down and brighter.

This is the photo filter settings that I used to edit the photo of my dad. I went for the cooling filter (LBB) to make it look a lot more cooled down otherwise it would of looked too hot.

Dog Edit
Original Photo

Edited Photo
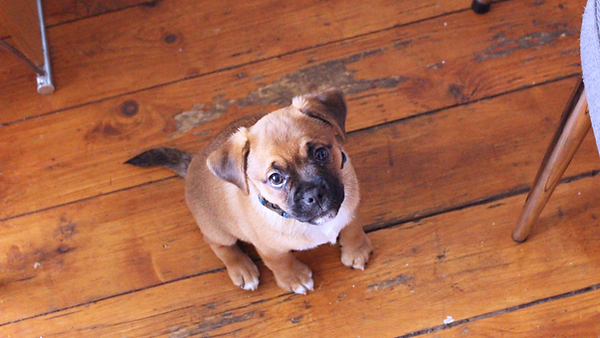
This is the edited photo of my dog that I edited. Overall I wanted a warmer look and a brighter look but also a cooler look to go with it so I added the brightness up and contrast down then I changed the due/saturation I added more hue and more saturation then I went onto the photo filter setting to add the cooling filter (LBB) and added 25% more density then finally went onto the colour balance setting to add more red a little bit of green and more blue. I added 13 red, 1 green and 14 blue.
This is the brightness/contrast settings that I used to edit the photo of my dog Hugo. I wanted a bright look so I put the brightness to 25 and the contrast to -8.

This is the hue/saturation settings that I used to edit the photo of my dog. I wanted a warmer look so I added more saturation and a little bit of hue to give a little cooler look.
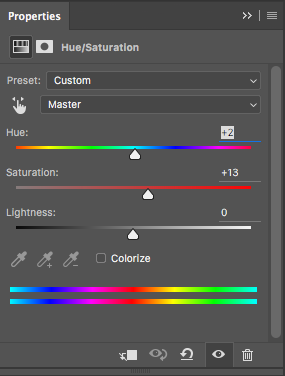
This is the photo filter settings that I used to edit the photo of my dog. I went for the cooling filter (LBB) setting because I thought the image was too warm so I wanted a little more of a cooler look.
This is the colour balance settings that I used to edit the photo of my dog. I wanted a warm look with a little bit of a cool look so I added 13 towards the red and 14 towards the blue and added 1 green.

Mum Edit

Original Photo

Edited Photo

With this photo I wanted a cooler look so I added a cooling filter and added blue and cyan to the colour balance of this photo and turned up the contrast in the contrast and brightness settings ans kept the brightness the same. Over all this photo looks a lot more cooled down and isn't as hot and is focused on my mum and my dog.
This is the brightness/contrast setting that I used to edit the photo of my mum in photoshop. I kept the brightness the same because I felt the raw photo was bright enoough and i added more contrast because I wanted to change it a bit from the raw photo.
This is the colour balance settings that I used to edit the photo of my mum. I added more cyan and blue to give it a cooler look.
This is the photo filter settings that I used to edit the photo of mu mum. I went for the cooling filter setting to give the photo a cooler look because I felt that it looked too hot when I was adding the colour balance to the photo.

Younger Sister Edit
Original Photo
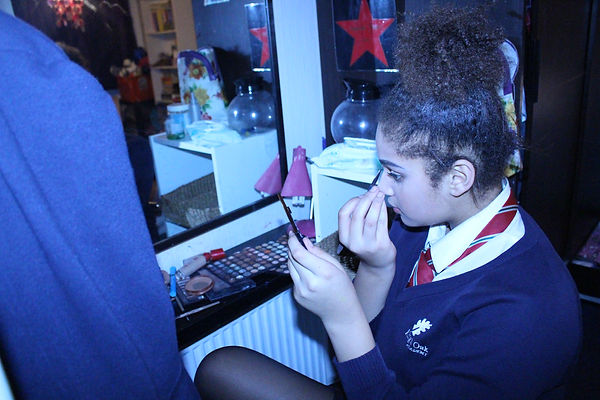
Edited Photo

With this photo I wanted a bit of a warmer look so I added the warming filter then I put down the brightness down a bit and contrast all the way up for the effect. This photo is focused mainly on my younger sister doing her makeup.
Youngest Sister Edit
Original Photo

Edited Photo

This is the photo I edited of my youngest sister. I wanted it to be a little darker look but with a cooling look so I added the cooling filter to the photo filter setting and added more contrast to the brightness/contrast setting to give a little darker effect look.
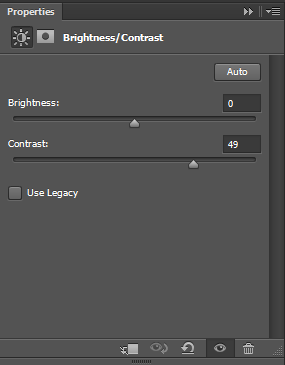
These are the brightness/contrast settings that I used to edit the photo of my younger sister. I put down the brightness by -5 because the raw photo I felt was bright enough and put the contrast all the way up to 100 to make it a little darker for a good effect.

This is the photo filter setting that I used to edit the photo of my younger sister. I went for the warming filter to make it look warmer and I put it to 47% to make the photo look warmer.

This is the brightness/contrast settings that I used to edit the photo of my youngest sister. I kept the brightness the same because I felt like it was bright enough in the raw photo and I put up the contrast a little to make it darker for effect.
This is the photo filter settings that I used to edit the photo of my youngest sister. I went for the cooling filter because I wanted to make it look cooler instead of it being warmer so I added the cooling filter up to 44%.
